
🦷 The Step-by-Step Dental Implant Procedure Explained
Missing a tooth (or several) can impact everything from your confidence to your ability to chew properly. Dental implants are one of the most reliable and long-lasting solutions available today. But what exactly does the procedure involve?
In this blog, we’ll walk you through the step-by-step dental implant process, so you know what to expect—from your first consultation to your final smile.
✅ Step 1: Initial Consultation and Assessment
Your journey begins with a comprehensive consultation with a dental implant specialist. During this appointment, your dentist will:
- Examine your mouth, gums, and remaining teeth
- Take X-rays or 3D scans of your jaw
- Review your medical history
- Determine if you need any preparatory procedures (like bone grafting)
If your jawbone isn’t strong enough to support an implant, bone grafting may be recommended before proceeding.
✅ Step 2: Treatment Planning
Using the scans and data collected, your dentist creates a customized treatment plan, including:
- Number of implants needed
- Type and size of implant
- Location of implant placement
- Timing of procedures (some may be spread over months)
✅ Step 3: Tooth Extraction (If Necessary)
If the damaged tooth is still present, it will be extracted. In many cases, the implant can be placed immediately after extraction—but sometimes healing time is needed before moving to the next step.
✅ Step 4: Bone Grafting (If Needed)
If your jawbone isn’t dense or thick enough, a bone graft might be necessary. This involves transplanting a small piece of bone (either natural or synthetic) to strengthen the area.
Healing after a bone graft typically takes 3–6 months before the implant can be placed.
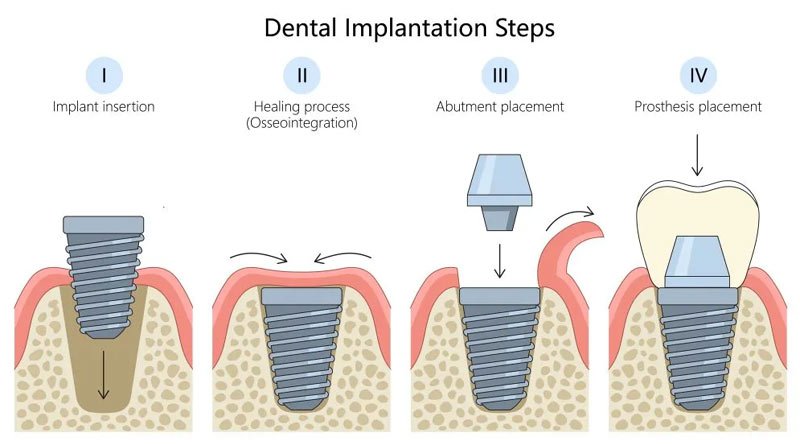
✅ Step 5: Dental Implant Placement
This is the surgical step where your dentist:
- Numbs the area with local anesthesia
- Makes a small incision in the gum
- Drills a small hole in the jawbone
- Places a titanium post (the implant) into the bone
This post serves as the artificial tooth root. Once placed, the gum is stitched up, and the healing process begins.
✅ Step 6: Osseointegration (Healing Period)
Over the next 3–6 months, your implant fuses with the jawbone in a process called osseointegration. This is crucial for stability and long-term success.
You may receive a temporary crown or denture during this healing phase.
✅ Step 7: Abutment Placement
Once healing is complete, your dentist reopens the gum slightly to attach an abutment, a small connector piece that links the implant post to your new tooth.
The gum is then allowed to heal again—usually taking about 2–3 weeks.
✅ Step 8: Crown Placement (The Final Tooth)
The final step is the placement of your custom-made crown (the visible part of the tooth). It is:
- Matched to the shape, size, and color of your natural teeth
- Attached to the abutment
- Checked for fit, bite, and aesthetics
Congratulations—you now have a permanent, natural-looking tooth!
💬 Final Thoughts
The dental implant process may take a few months, but the results are well worth the time. With proper care, implants can last 15+ years or even a lifetime.
If you’re considering dental implants, don’t hesitate to schedule a consultation. The sooner you start, the closer you are to restoring your smile.